How to Easily Test Your Rain Gauge Calibration—and Avoid Errors
by Mike Nelson | Updated: 02/28/2019 | Comments: 4
Blog Topics
Area / Application


Product Category


Corporate / News
Search the Blog
Subscribe to the Blog
Set up your preferences for receiving email notifications when new blog articles are posted that match your areas of interest.
Suggest an Article
Is there a topic you would like to learn more about? Let us know. Please be as specific as possible.
Testing the calibration of your rain gauge is a simple process. But as you know, it’s also easy to introduce problems, such as incorporating simulated data as real data. In this article, we’ll review a useful feature that automates the testing process and can help you avoid errors.
The process of programming or configuring a data logger is normally only done once at the beginning of an application. Yet, the data logger is often used on regular site visits to verify proper operation and calibration of the connected sensors, as well as to test communications and several other site-service tasks. These tools are built into the free Hydro-Link™ software interface to help you save time and increase efficiency in your site-service activities.
Verifying the operation of a rain gauge is one of the site-service activities that is often done on a regular schedule. When you use the Hydro-Link software interface with a CR300 or CR310 datalogger, testing the calibration of your rain gauge is a simple process that resolves many common issues.
Rain Gauge Calibration Check
Applications that use rain gauges often require the rain gauge calibration to be verified at regular intervals. You may perform this calibration check after completing other tasks, such as cleaning and checking the level of your rain gauge. You may, like others, check the calibration by pouring a set amount of water into the rain gauge at a set flow rate to simulate rainfall at a specific rate per hour. This should cause the data logger to measure a fixed amount of rainfall. Any difference from the expected amount would be an error.
This type of test is simple, based on the current procedures commonly used. Unfortunately, without using Hydro-Link, you may experience some of the following:
- Simulated data may show up as real data if the data logger runs through a normal measurement sequence while the test is running.
- It is important to remember the original rainfall value so when the test is complete, you can reset the rainfall value to the original value.
- In some cases, you may have physically disconnected the rain gauge from the logger and connected the gauge to a different counter. While this keeps the simulated data out of the real data, it creates a possible error when you reconnect the gauge to the logger.
- Based on the last point, after the gauge is reconnected, you may tip the bucket once to make sure it is working properly. Unfortunately, this tip ends up in the real data.
- If the gauge is disconnected, you must remember to reconnect it to the logger. We realize this may seem obvious, but it is easy to forget.
- After the test is complete, you must record the results manually.
The tool in Hydro-Link automates the test and resolves all the issues we’ve mentioned above. The following sections will help you use Hydro-Link for your rain gauge calibration.
The Dashboard
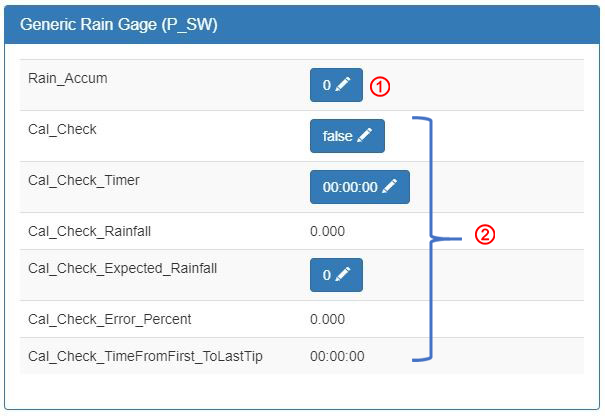
When you use the generic rain gauge option in Hydro-Link, the following screen is displayed on the dashboard for the rain gauge:
 |
The top value shows the current rain accumulation. You can edit this value so that the rain value can be preset to a known value. |
 |
You use all the other options on the dashboard to verify the rain gauge calibration. The three options with buttons may require your input. The other options show test results. |
Pretest Setup
Before you start the test, you need to enter the expected amount of simulated rainfall. Click the button for Cal_Check_Expected_Rainfall to enter the expected rainfall amount:

A commonly used size of calibration beaker holds 946 milliliters of water, which is equal to 1.15 inches of rain in an eight-inch rain gauge. If you are using inches for your rainfall unit of measurement, enter 1.15 for the expected rainfall. The following shows how this value was determined:
|
For an 8 in. rain gauge |
Starting the Test
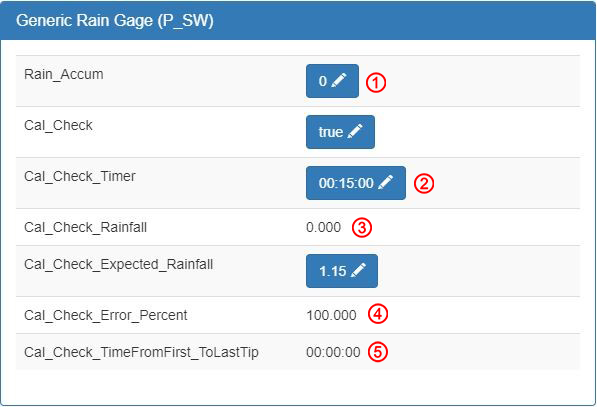
To start the test, click the toggle button to change Cal_Check from false to true.

After the test is started, the data logger automatically performs several actions described below:
|
The main Rain_Accum variable is automatically disconnected internally from the input, so this value will not increase during the test. If a scan or measurement process happens while the test is running, this unaltered value will be used without the simulated rainfall affecting it. |
|
For the test run time, a timer is set to 15 minutes. This will decrement to 0, and the test will automatically stop running. If the test will take longer than 15 minutes, you can easily change this time to the desired amount needed. |
 |
The rain gauge input is automatically connected to this test accumulator. As you pour water into the gauge to simulate rainfall, the Cal_Check_Rainfall variable increases, indicating how much simulated rainfall has been measured. |
 |
The error percentage value decreases as water flows into the gauge. After the water stops flowing, this value shows the total error as a percentage. |
 |
Using the time from the first tip to the last tip, it is easy for the user to calculate the rate of rainfall. |
After the Test Is Running
After the test is running, you can start the flow of simulated rainfall into the gauge at the desired rate. Typically, the container holding the water has an outlet fitting that controls the water flow. This flow represents a specific rate of rain—for example, four inches of rain per hour.
Tip: To have accurate results, ensure that all the water in the container is poured into the rain gauge before the test is complete.
As the water flows into the rain gauge, the percentage error decreases until the measured value is the same as the expected rainfall. At that point, the error percentage is 0.00.
- If the container is empty at that point, the gauge has a 0.00% error.
- If more water continues to flow into the gauge, the error value starts to increase.
After all the water in the container has passed through the rain gauge, the error value and accumulation value stop changing.
After all the water has passed through the gauge, you can manually stop the test by clicking the toggle button for Cal_Check—just like you did when you started the test. Alternatively, you can just let the timer expire.
Test Completion
After the test is complete, all the results are stored in a table file named “RainfallSimHist” that you can retrieve at any time. The table has an entry for each time the calibration check was used. The following example table has two lines of data at the bottom, which show that the test was run twice:
"TOA5","HLink","CR300","1123","CR310.Std.08.01","","","RainfallSimHist"
"TIMESTAMP","RECORD","Cal_Check_TimeFromFirst_ToLastTip","Cal_Check_Rainfall","Cal_Check_Expected_Rainfall","Cal_Check_Error_Percent"
"TS","RN","","","","%"
"","","Smp","Smp","Smp","Smp"
"2018-08-24 17:53:45",0,"00:14:28",1.13,1.13,1.74
"2019-01-22 22:22:15",1,"00:14:42",1.12,1.12,2.60
The end results show a 1.74% error in August of 2018 (2018-08-24) and a 2.60% error in January of 2019 (2019-01-22).
After the test is complete, the system returns to recording rainfall normally.
Intensity
If you need data for simulated rainfall intensity, you can calculate the intensity per hour using this equation:
Rain intensity/h = (3600 s/h) / test time (s) * Rainfall
If you look at the data from the last test in the table file above, the time from the first tip to the last tip was 14 minutes and 42 seconds (14:42), which is 882 seconds. The measured rainfall was 1.12 inches. Using these values in the equation, we can calculate the rainfall intensity:
Rain Intensity/h = (3600 s/h) / 882 s * 1.12 in. = 4.57 in./h
Evaluating Test Results
Tipping bucket rain gauges, by their nature, require regular servicing and calibration checks. Each organization sets the interval for how often a gauge must be checked and decides which error limits are considered acceptable.
For example, you might choose to use guidelines such as these:
- 8-week cleaning schedule
- 16-week calibration test schedule
- If the calibration error is less than 2.5%, no action is required.
- If the calibration error is less than 5%, attempt a field recalibration.
- If the calibration error is greater than 5%, replace with a verified gauge.
Resources Available to You
The rain gauge calibration check tool is one of many tools available in the Hydro-Link software. These tools are provided to make your site visits easier and to increase the confidence on all operational aspects at the site. To get started using Hydro-Link, refer to these resources:
- Download your free copy of the Hydro-Link software.
- Watch a video tutorial series about using Hydro-Link.
Please contact a Campbell Scientific sales or support representative for more information about rain gauge calibration or other Hydro-Link options and field-service tools.


About the Author
 Mike Nelson was a Market Sales Specialist in the Environmental Group at Campbell Scientific, Inc. He has more than 30 years’ experience as an electrical engineer designing hardware and software products for the water monitoring industry. An extraordinary amount of Mike’s time while engineering was spent working directly in the field with the customers, which greatly influenced his designs and the teams he managed. Mike enjoys spending his free time out of doors.
Comments
Clayton | 05/22/2019 at 10:41 AM
This sounds like it could be a very useful tool for us. Why is it only compatible with the CR300 and CR310?
rguerrero | 05/22/2019 at 11:26 AM
The CR300/CR310 is used in the vast majority of our surface water stations, and therefore the most likely candidate for the initial creation of this software. We have not recieved enough requests to create a version that is used on other dataloggers.
m.fischer.85L | 07/28/2023 at 12:13 PM
This is more of a general question about the calibration process. The notion of adding water to the bucket at a known and reasonable rate is not easy. Is there a special device or bottle that allows this to be done?
Robin D | 07/28/2023 at 07:24 PM
This response is from our Technical Support team:
There are not specific calibration devices that Campbell Scientific offers for the rain gauges. You can find bottles from other providers that are designed for calibration. You can also use a generic bottle or tap as long as you can control the speed of the flow. For onsite calibrations, you can use a bottle or can and then poke holes in the bottom. As long as the holes are small enough, that would work as a calibration tool, although it is less precise. For more information, see the calibration information in the TE525 manual: https://s.campbellsci.com/documents/us/manuals/te525.pdf.
Please log in or register to comment.