How to Use Keypad Commands with Edlog Data Loggers
by Bruce Smith | Updated: 01/09/2019 | Comments: 0
Blog Topics
Area / Application


Product Category


Corporate / News
Search the Blog
Subscribe to the Blog
Set up your preferences for receiving email notifications when new blog articles are posted that match your areas of interest.
Suggest an Article
Is there a topic you would like to learn more about? Let us know. Please be as specific as possible.

Whether your Edlog-based data logger has a built-in keypad, an external keypad, or no keypad at all, keypad commands are an important field tool. But, if you don’t have a keypad, how do you use keypad commands? In this article, we’ll discuss this topic and several others.
An important field tool with Edlog-based data loggers is the keypad. Keeping your Edlog data logger running can often require you to use commands on the keypad. Some data logger models, such as the CR23X, have a built-in keypad. For all the other Edlog data logger models, you need to use an external keypad, such as the CR10KD.
Help from Prompt Sheets
The display on the keypad is limited, so numeric codes are used for commands and responses. The language the data logger “speaks” on the keypad is known by few. To help you, the equivalent of Google Translate is available in the form of a prompt sheet.
When Edlog data loggers were shipped, they included a laminated copy of the prompt sheet. You can still download and print a copy from the Campbell Scientific website. The prompt sheets can be found in the Documents | Manuals section of the web pages of the respective Edlog data loggers. Alternatively, you can access the prompt sheets here:
- 21X Prompt Sheet
- CR10 Prompt Sheet
- CR10X Prompt Sheet
- CR21 Prompt Sheet
- CR23X Prompt Sheet
- CR510 Prompt Sheet 1 and CR510 Prompt Sheet 2
Working without a Keypad
What do you do if you have a prompt sheet but no keypad? Unfortunately, with parts obsolescence, we can no longer build a CR10KD keyboard display. However, you can use a computer terminal to access a remote keyboard mode. There are several options for getting a Terminal screen. One easy way is to use the Unknown Device setting in the Device Configuration Utility (DevConfig).

DevConfig is included with PC200W, PC400, and LoggerNet, or you can download it as standalone software from the Downloads section of the DevConfig product page.
Hopefully you are already familiar with the physical cable connections. If not, please refer to this blog article on the subject: “Successfully Connect Your Retired Data Logger to a PC.”
To access a Terminal screen with DevConfig, follow these steps:
- Select Unknown from the device list. Use the more button (three dots) to select the correct COM port being used to connect to the data logger.
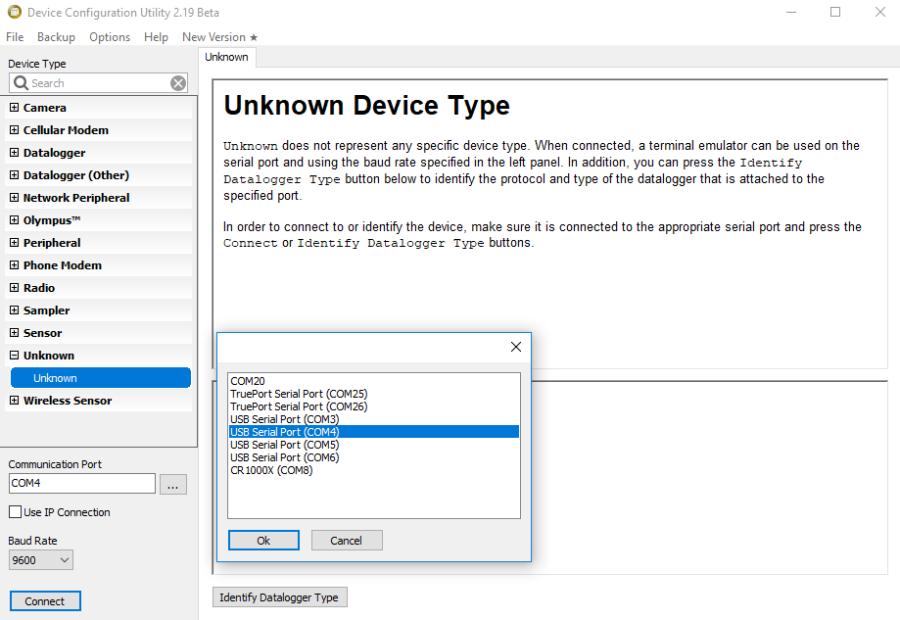
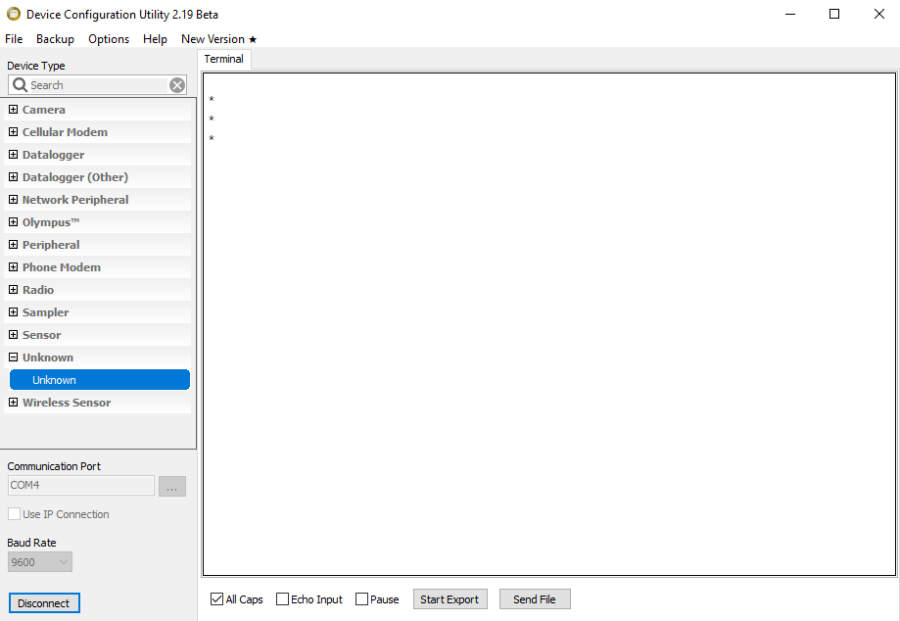
- After selecting the COM port and OK, set the baud rate to 9600 and click Connect. You should now see a Terminal screen.
- Press the Enter key on your keyboard several times. If the terminal emulation software is configured properly and the data logger is “listening,” it will send back an asterisk (*) every time you press the Enter key.
- The data logger only understands capital letters. Press the Caps Lock key on your keyboard to turn the capital letters on, or select the All Caps checkbox at the bottom of the Terminal screen, if available.
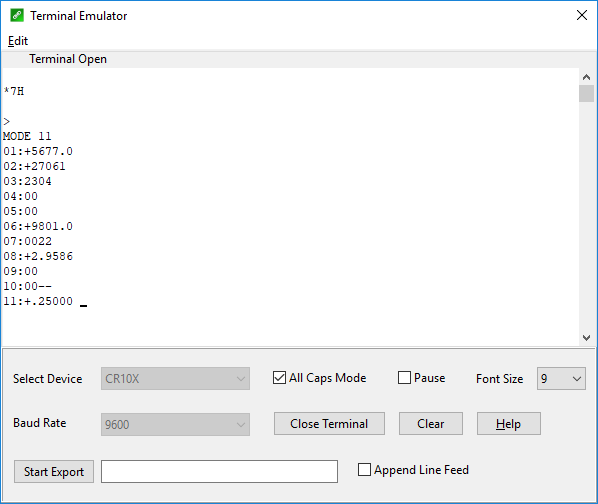
- You will need to get the data logger into remote keypad mode. Type 7H at the asterisk, and press the Enter key on your keyboard. The data logger will send back a prompt (>) to show that you’re in remote keypad mode.
Helpful Keys on Your Keyboard
As we explore the various modes (or areas) where data is stored on your data logger and how to access them, you’ll want to take advantage of the functionality of some of the keys on your keyboard:
| Keyboard Key | Function It Performs |
|
A or Enter |
Advances to the next parameter. |
|
B |
Backs up one parameter. |
|
C |
Allows a change to the current parameter. |
|
D |
Enters a decimal point. |
Data Logger Modes
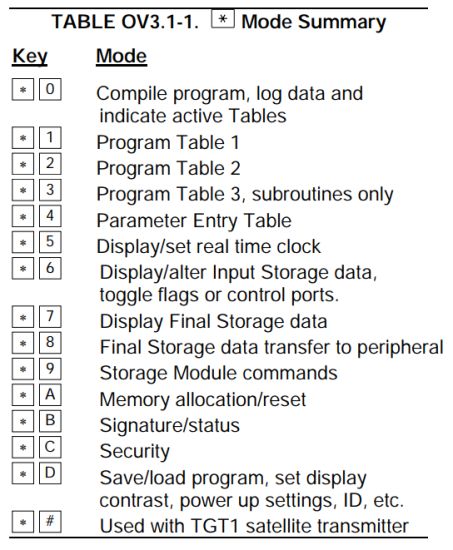
The data logger has various areas where it stores information such as the program, time and date, memory partitioning, etc. These areas are called modes, and you can access them by pressing the asterisk key (*) followed by the appropriate number or letter.
Tip: You can change from mode to mode at any time, but be careful, as the data logger will not accept changes without you pressing the A or Enter key after entering the desired change.
This table lists frequently used key commands for accessing the various data logger modes:
The following sections describe the modes you’ll probably use the most.
*0: Log data and indicate active tables
This mode causes the data logger to do the following: compile any changes in its program, start logging data, and stop communication with the keypad. When you are in this mode, the keypad displays L061 or L0612 depending on how the data logger is programmed. The terminal will display LOG1, LOG12.
Always use the *0 command when you are done interacting with the data logger. If you happen to forget to use this command before leaving the data logger, it will lock out any other communication. The data logger will automatically reset within 45 seconds if it doesn’t “hear” from the keypad.
*1, *2, and *3: Program tables
These are data logger programming modes. Changes you make here will affect the running program(s), so be careful.
Note: If you are unable to access this location, the data logger may have a security code set. (For more information, read the “How to Use Data Logger Security Codes” blog article.) If you know the code, type *C followed by the security code, and then press the Enter key on your keyboard.
Here is an example of how you can use the Terminal screen to type a very basic program that does the following: scans the data logger every five seconds, makes a battery voltage measurement (P10 instruction) and stores the output in location 1, and makes a panel temperature measurement (P17 instruction) and stores the output in location 2:
5 Enter
10 Enter
1 Enter
17 Enter
2 Enter
*0 Enter
The screen would look like this:
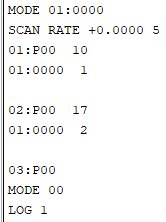
This simple program is not storing historical data in the memory—just the current input location values that refresh every scan. (Learn more about this in the *6 section below.)
*5: Display/set data logger clock (date and time)
You can use this mode to check the current time of the data logger. You can also use it to set the year (following the Julian calendar of 365 days) and the present time (based on a 24-hour clock). For example:
| :HH:MM:SS | (Displays the current data logger time.) |
| 05:XXxx | Year (The CR10 displays two characters; the CR10X displays four characters.) |
| 05:xxxx | Julian Day (1 to 365) |
| 05:HHMM | Hours Minutes |
*6: Input location values
In this mode, the data logger “wakes up” and measures the sensors based off the program scan rate. For example, the data logger may “wake up,” or scan, every five seconds. All new measurements are stored at these input locations. The order that the measurements are made and displayed is dictated by the program structure.
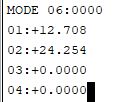
In the example above with the simple P10 and P17 instruction program, the Terminal screen would look similar to the example below, where the battery voltage is reporting 12.708 and the panel temperature is reporting 24.254 degrees C:
*7: Final storage data
Your data logger stores values to this area based off the data storage instructions used in the program. Common rates are hourly, daily, or both. The data logger stores data in an array that contains 16 elements per array. With a typical program, the data logger can store approximately three months’ worth of data before it starts to overwrite the oldest array in storage with new data.
You cannot alter this area directly, but you can view the values. Below is an example listing how the data could be structured:
- Array ID – 60
- Year
- Julian Day (1 – 365)
- Hour/Minute (HHMM based on a 24-hour clock)
- Battery Voltage Maximum – Volts DC
- Battery Voltage Minimum – Volts DC
- Enclosure Relative Humidity Maximum – %
- Enclosure Relative Humidity Minimum – %
- Data Logger Temperature Maximum – Celsius
- Data Logger Temperature Minimum – Celsius
- Air Temperature Average – Celsius
- Air Temperature Maximum – Celsius
- Air Temperature Minimum – Celsius
- Relative Humidity Average – %
- Relative Humidity Maximum – %
- Relative Humidity Minimum – %
- Wind Speed Maximum
- Wind Vector
- Solar Radiation Average
- Solar Radiation Maximum
- Rainfall
*A: Memory allocation
Your data logger has a finite amount of memory that is allocated based on the program that it’s running. You can access the memory information and reset the data tables from this mode.
Warning: Changing any values in any of the parameters in this area —even if you are re-entering the same value—will cause the data logger to lose all the stored data in its memory!
| 01:xxxx | Number of input locations (Default is 28.) |
| 02:xxxx | Intermediate storage locations (Default is 64.) |
| 03:x | Final storage locations – Area 2 |
| 04:xxxxx | Final storage locations – Area 1 |
| 05:xxxx.x | Memory allocated for program (bytes) This area is also used to force the data logger to a complete reset.
|
| 06:xxxx.x | Remaining program memory (bytes) |
Tip: Do not try to communicate with the data logger for two or three minutes after a reset.
*B: Data logger status/on-board firmware
Your data logger tracks what firmware it’s running internally, as well as any problems it might encounter. For example, it provides information regarding Watchdog, table overrun, and low 12V errors.
| 01:xxxxx | Program signature |
| 02:xxxxx | Operating system signature |
| 03:xxxxx | Kbytes memory In the CR10X datalogger, this number represents Flash + SRAM and should be 0256 for standard memory size. (For the 1 MB option, the memory should be 1280. For the 2 MB option, the memory should be 2304.) This data logger is protected to power up properly and should never have a problem with incorrect memory size. |
| 04:xx | Number of E08s (Type 88 then press the A key or the Enter key on your keyboard to reset.) This value represents errors caused during data logger program execution. Under normal conditions, this value should always be 00. The maximum value for the area is 99. Errors recorded in this location usually represent communications problems with the central computer or power surges caused by fluctuating AC voltage or lightning strikes. |
| 05:xx | Number of table overruns (Type 88 then press the A key or the Enter key on your keyboard to reset.) This value represents errors caused during data logger program execution. Under normal conditions, this value should always be 00. The maximum value for the area is 99. Errors recorded in this location usually represent communications problems with the central computer or power surges caused by fluctuating AC voltage or lightning strikes. |
| 06:x.xxxx | Operating system version number |
| 07:xxxx | Revision number |
| 08:x.xxxx | Lithium battery voltage |
| 09:xx | Low 12V battery detection counter (Type 88 then press the A key or the Enter key on your keyboard to reset.) |
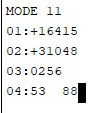
Always reset the 04:, 05:, and 09: areas if they show values other than 00. To reset these values to 00, type 88 with the cursor at the end of the line that needs to be reset. Then press the A key or the Enter key on your keyboard. In the example shown below, 04: has 53 errors, and 88 has been typed in. The next step would be to press the Enter key:
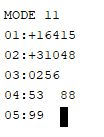
After the Enter key is pressed, the terminal moves to 05: and displays 99 errors:
After clearing all the errors, press the B key on your keyboard to back up and verify the error counter was reset to 00.
*C: Security
You use this mode with a security code to lock people out of specific areas of the data logger.
Warning: Don’t access this area unless you know how to use it. (For more information, read the “How to Use Data Logger Security Codes” blog article.)
Accessing Keypad Commands on Data Loggers with -PB Operating Systems
If you have a CR510, CR10X, or CR23X that uses the PakBus™ (PB) operating system, you generally won’t need to use a keypad. The data monitor in PC200W or LoggerNet software provides you with access to a table that has most of the functionality of a keypad.
When you do need to use a keypad command, you must use the terminal emulator. The terminal prompt will start out as >. There is no need to type 7H.
Note: DevConfig Unknown Terminal will not work with these -PB data loggers. Instead, use the Terminal Emulator through the PC200W, PC400, or LoggerNet software. You can access the Terminal Emulator through the Connect screen.
- From the Datalogger menu item at the top, select Terminal Emulator…
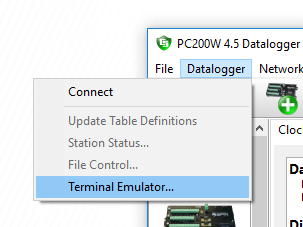
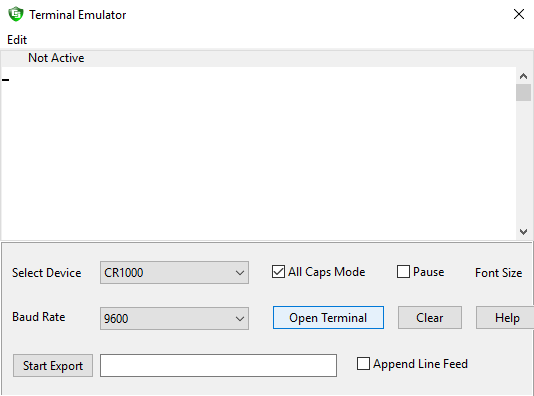
- After the Terminal Emulator opens, click Open Terminal:
You can also access these modes from your central computer by using HyperTerminal or another terminal emulation package, if available.
More Information
As we mentioned in the “Edlog Data Logger Support and You” blog article, free support for our older, Edlog-based data loggers ended on January 1, 2019. Because we realize these reliable, older data loggers may still be serving you well in your applications, we offer other methods to provide you with the support you need to succeed with your applications. For example, read the Edlog data logger support blog article to learn more about these options.
Credits: Jacob Davis, Technical Support Manager at Campbell Scientific, Inc., contributed to this article.
If you have any questions or comments, please post them below.


About the Author
 Bruce Smith is a Technical Support Specialist at Campbell Scientific, Inc. He provides technical support for many Campbell Scientific products and specializes in supporting weather stations used in the commercial irrigation industry. Bruce’s background is in building maintenance. Away from work, he enjoys spending time with his family and dogs, being outdoors, and tinkering with cars.
Comments
Please log in or register to comment.