Factory-installed and tested wiring by experienced technicians


Overview
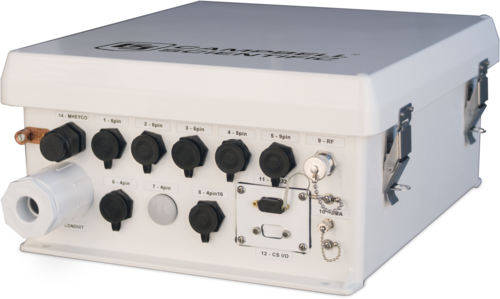
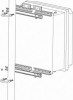
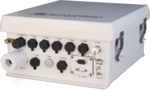
The PWENC16/18 is a prewired, weather-resistant enclosure that is 16 in. wide and 18 in. tall. It starts with the same enclosure used for our ENC16/18, but then is factory configured with up to 19 connectors that are attached to the data logger or peripherals within the enclosure. Sensors with the appropriate connector are simply attached to connectors on the outside of the enclosure. The PWENC16/18 includes a basic measurement program (created in ShortCut) for the -PW products sold as part of this system. If a more advanced custom data logger program is required for additional sensors, communications, control, or other needs, an extra fee will be incurred.
Read MoreBenefits and Features
- Weather resistant to protect instruments
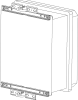
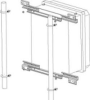
- Backplate designed so that Campbell Scientific components mount easily and securely
- Combines flexibility with ease of use
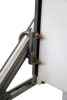
- Eliminates the task of wiring sensor leads into the data logger’s terminal strips
- Reduces wiring errors by inexperienced field technicians who are unfamiliar with the equipment
- Shortens deployment time
- Allows each enclosure in a large network to be similar to the other enclosures
- Customized options may be purchased
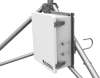
- White, UV-stabilized enclosure reflects solar radiation—reducing temperature gradients inside the enclosure without requiring a separate radiation shield
Images


Detailed Description
The PWENC16/18 can house one data logger, power supply, and one or more peripheral (depending on the peripheral’s footprint). You order the sensors, data logger, power supply, and communication peripherals separately. Compatible sensors, peripheral cables, and solar panels have a –PW extension.
The PWENC16/18 is shipped with the 7363 enclosure supply kit that consists of desiccant, a humidity indicator card, cable ties, wire tie tabs, putty, grommets, screws, and PVC coupling. Connectors, communication ports, and the enclosure mounting bracket are chosen as options. (See Ordering Info on the web page.)
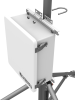
The PWENC16/18 can be mounted to any of our tripods or towers, or to a user-supplied pipe.
Note: Refer to the Ordering Info on the web page for standard configurations. Nonstandard configurations must be special ordered. It is considered a nonstandard configuration when using a different type, size, or location for any connector, communication port, conduit, cable entry seal, or antenna bulkhead (contact Campbell Scientific for more information).
Specifications
| Color | White (Reflects solar radiation, reducing temperature gradients inside the enclosure without using a separate radiation shield.) |
| Construction | Fiberglass-reinforced polyester enclosure with door gasket, external grounding lug, stainless-steel hinge, and lockable hasps |
| Enclosure Classification | NEMA 4X (before being modified for cable entry) |
| Dimensions |
|
| Weight | 7.7 kg (17 lb) |
Compatibility
Note: The following shows notable compatibility information. It is not a comprehensive list of all compatible or incompatible products.
Data Loggers
| Product | Compatible | Note |
|---|---|---|
| 21X (retired) | ||
| CR10 (retired) | ||
| CR1000 (retired) | ||
| CR1000X (retired) | ||
| CR10X (retired) | ||
| CR200X (retired) | ||
| CR206X (retired) | ||
| CR211X (retired) | ||
| CR216X (retired) | ||
| CR23X (retired) | ||
| CR295X (retired) | ||
| CR300 (retired) | ||
| CR3000 (retired) | ||
| CR310 | ||
| CR350 | ||
| CR500 (retired) | ||
| CR5000 (retired) | ||
| CR510 (retired) | ||
| CR6 | ||
| CR800 (retired) | ||
| CR850 (retired) | ||
| CR9000 (retired) | ||
| CR9000X (retired) |
Additional Compatibility Information
Peripherals
Our prewired enclosures can house any peripheral that our standard enclosures can house. Equipment that can be attached to the outside of the prewired enclosure include:
- Sensors—models with an -PW extension are compatible; a -PW version is available for most Campbell Scientific sensors.
- Digital camera—the cable used to connect a CC5MPX or CC5MPXWD high-resolution digital camera has a -PW cable termination option.
- AC wall charger—the 22110 Wall Charger (accepts 110 to 240 Vac) has the appropriate connector.
- Solar panels—Campbell Scientific offers -PW versions of our 10 W, 20 W, 50 W, and 90 W solar panels.
- Keyboard display—the CR1000KD can be connected via an optional CS I/O port.
- Laptop—an RS-232 or CS I/O port can be added to the outside of the enclosure allowing laptop connection.
- Ethernet cable—an optional Ethernet port is offered that supports communications over a local network or a dedicated Internet connection.
- Antennas—the outside of the enclosure can include connectors for attaching antenna cables.
- Measurement and control peripherals—cables used to connect our SDMs and multiplexers come in -PW versions.
Documents
Frequently Asked Questions
Number of FAQs related to PWENC16/18: 9
Expand AllCollapse All
-
Components can be easily replaced; however, it may be necessary to do some rewiring and system reprogramming. For assistance with rewiring and reprogramming, contact Campbell Scientific.
-
If you purchased a Stahlin enclosure from Campbell Scientific and it has a failed gasket, we can help you. We will need you to provide an image of the failed gasket, verify the size of your enclosure, and provide your contact information. We can then arrange to have a replacement gasket sent to you from Stahlin. For assistance, contact Technical Support at 435.227.9100.
-
It depends on the device. Most devices have built-in mounting flanges, but some items require a separate mounting bracket.
-
Yes. Each enclosure Campbell Scientific sells has a powder-coated backplate with holes on 1 in. centers that match the mounting flanges on our equipment for easy mounting.
-
Yes. The CD100 mounts in an enclosure door and supports all of the CR1000KD capabilities. With the CD100, historic and real-time data can be read, and instructions can be entered without opening the enclosure door.
Another available option that displays real-time data only is the CD295.
-
The putty is shipped as part of the 7363 Enclosure Supply Kit. To order an additional 4 ounce container of electrician’s putty, specify pn 6596.
-
The desiccant should be replaced when the top colored dot on the humidity indicator card (pn 28878) turns pink; the humidity indicator card is included in the enclosure supply kit that is shipped with each enclosure. If the CS210, Enclosure Humidity Sensor, is used, replace the desiccant when the measured humidity exceeds 35%.
-
The following information is applicable to many of Campbell Scientific’s standard enclosures and prewired enclosures.
Note: The procedure below will not work for torn or damaged seals.
To make a field repair to a loose gasket on an enclosure, first acquire an adhesive, such as standard Gorilla Glue, that is rated for use with polyurethane foam. The adhesive should be compatible with, and recommended for, use with polyurethane foam. Follow these steps:
- Pull the gasket away from the gasket channel, being careful not to tear the gasket. The gasket does not need to be removed completely. Rather, remove only those areas that have pulled loose on their own. To keep the gasket up out of the way, lay a small object (such as a toothpick, pen, or pencil) horizontally across the channel.
- Using an adhesive that is rated for use with polyurethane foam, apply a small bead of adhesive to the gasket channel. Because the adhesive’s only function is to keep the gasket in place, use it sparingly.
- Remove any objects that were holding the gasket out of the way.
- Carefully place the gasket in the gasket channel.
- Wait 1 to 3 hours for the adhesive to cure before closing the door.
Privacy Policy Update
We've updated our privacy policy. Learn More
Cookie Consent
Update your cookie preferences. Update Cookie Preferences